Lighting is the key to turning a normal portrait into a stunning, professional-looking picture. Setting up lights may seem hard at first, but the good news is that you don’t need expensive gear or complicated setups to obtain outstanding results.
If you’re new to or want to take photography courses, knowing a few simple lighting setups will help you take clear, flattering photos with confidence.
Here are some easy ways to set up lights that you can try right away.
1. Natural Window Light (Soft and Flattering)
Best for: Indoor portraits
Equipment needed: A window + a reflector (or white chart paper)
The easiest and most beginner-friendly way to get light is from the sun. Put your subject close to a big window that lets in soft daylight.
How to do it:
- Tell your subject to sit with their back to the window.
- If the shadows are too dark, use a reflector on the other side to send light back.
- Stay out of direct sunlight that is too strong. If you need to, use drapes to block the light.
Why it works:
- Soft light makes shadows less sharp.
- The skin seems smooth and real.
- Great for taking pictures of people and everyday life
Students in photography courses generally study this arrangement first since it shows how the direction and softness of light can change a portrait.
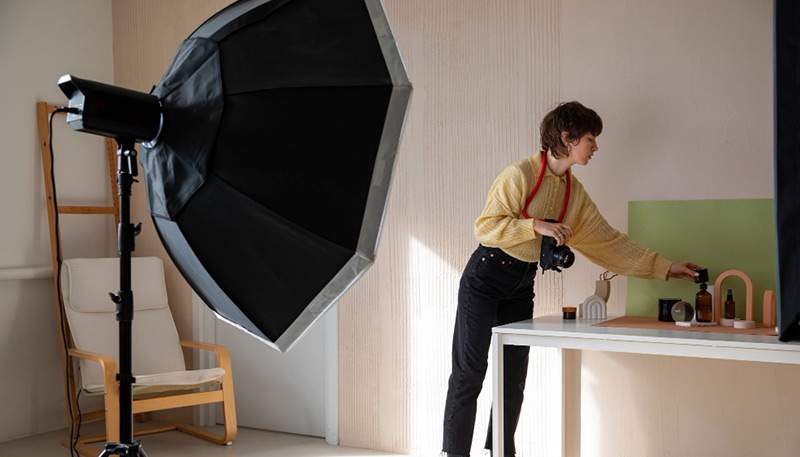
2. One-Light Setup (The Most Versatile)
Best for: Professional-looking portraits
Equipment needed: One softbox or LED panel
A single light source at a 45-degree angle to your subject makes shadows, depth, and dimension.
How to do it:
- Put the light just above the person’s eye level.
- Point it down at a gentle angle.
- Change the distance to change how soft it is (closer = softer).
Why it works:
- Great for beginners
- Creates a natural, flattering look
- Works in small spaces
This is the best way to get clean, professional headshots.
3. Rembrandt Lighting (Classic, Dramatic Look)
Best for: Artistic or moody portraits
Equipment needed: One softbox or LED light
Rembrandt lighting makes a little triangle of light on the side of the face that is under shade. It is named after the legendary painter Rembrandt.
How to do it:
- Put your light high up and at a 45-degree angle to the subject.
- Turn your subject until a small triangle of light shows under the eye on the side that is darker.
Why it works:
- Adds depth
- Creates cinematic, dramatic effects
- Highlights facial structure
Anyone who wants to do portrait painting seriously has to learn this technique.
4. Butterfly Lighting (Beauty & Glamour)
Best for: Beauty portraits, makeup shots, studio headshots
Equipment needed: Ring light or softbox
Butterfly lighting makes a little shadow right beneath the nose that looks like a butterfly.
How to do it:
- Put the light right in front of the subject, just above their head.
- Tell the person to look straight at the light.
Why it works:
- Smooths skin texture
- Enhances cheekbones
- Widely used for fashion & beauty photography
Simple to set up, perfect for cosmetics artists and content developers.
5. Backlighting (Dreamy & Soft)
Best for: Outdoor portraits, couples, lifestyle shots
Equipment needed: Sunlight or a strong light source
This setup places the light behind your subject.
How to do it:
- Put the subject in front of you and the sun or light.
- Use a reflector to fill in the shadows on your face.
- For a warm glow, shoot during the golden hour.
Why it works:
- Creates a beautiful halo effect around hair
- Excellent for romantic, soft portraits
- Adds depth and mood
During outdoor field trips, photography courses often teach this style.
6. Split Lighting (Bold & Powerful)
Best for: Dramatic, high-contrast portraits
Equipment needed: One directional light
With split lighting, one side of the face is lit up while the other is dark.
How to do it:
- Put one light at a right angle to the subject.
- To make the contrast even, change the height and distance.
Why it works:
- Makes strong, bold portraits
- Great for people who play sports, write, or do music
- Adds personality and a powerful mood
This configuration is great if you want something else than soft portraiture.
7. Using a Reflector (Simple Yet Highly Effective)
Reflectors are cheap and very useful for lighting portraits. They help fill in the shadows and even out the light.
Types of reflectors:
- White: Natural, soft fill
- Silver: Bright, cool tone
- Gold: Warm, sunset-like tones
- Black: Reduces light (for deep shadows)
How to use:
Put the reflector exactly across from the main light source.
This one tool can make pictures look much better, even without added illumination.
Tips for Better Portrait Lighting (No Matter the Setup)
- For softer shadows, keep the light close.
- Don’t put the light too low, because it will make shadows that don’t look good.
- For clean portraits, use plain backdrops.
- Instead of relocating the subject, try different angles.
- Before adding more lights, practice each configuration.
Photographers learn these basics early on, especially in controlled programs like photography courses, where they get to practice what they’ve learned and feel more confident.
Conclusion
You don’t need a whole studio to learn how to light portraits well. As a beginner, you may take clean, expressive, and professional portraits using simply natural light, a single lamp, or a simple softbox.Start with one or two configurations, practice often, and pay attention to how light changes the contour of the face. If you want to learn more, signing up for one of the well-known photography courses in Kolkata will help you learn how to use lighting both indoors and outdoors with the help of professionals.